How to Set Up a Google Maps API Key: Step-by-Step Guide

Introduction
Google Maps API Key is one of the most widely used mapping platforms for developers and businesses. Whether you’re building a store locator, tracking deliveries, or integrating interactive maps into your application, Google Maps APIs can make it all possible. However, before developing, you need an API key — a unique identifier that allows your app to communicate securely with Google services.
In this guide, we’ll walk you through how to set up a Google Maps API key, so you can start integrating rich, interactive maps into your website or app.
What Is a Google Maps API Key?
A Google Maps API key is a unique string that authenticates requests associated with your project. It allows Google to monitor usage and ensure security, and it gives you access to various Google Maps services such as Maps JavaScript API, Places API, and more.
Step by Step Guide to create Google Map API Key
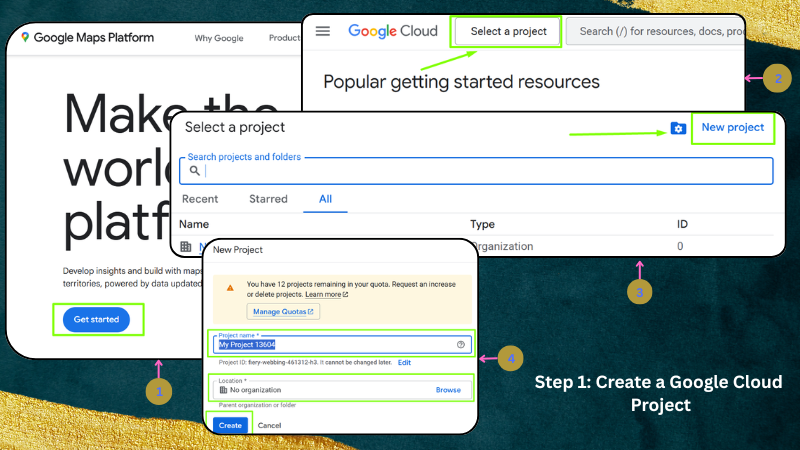
Step 1: Create a Google Cloud Project
First, you’ll need a Google Cloud Platform (GCP) project.
1. Visit the Google Cloud Console.
2. Click the project dropdown at the top and select “New Project.”
3. Enter a name for your project, optionally choose an organization, and click “Create.”
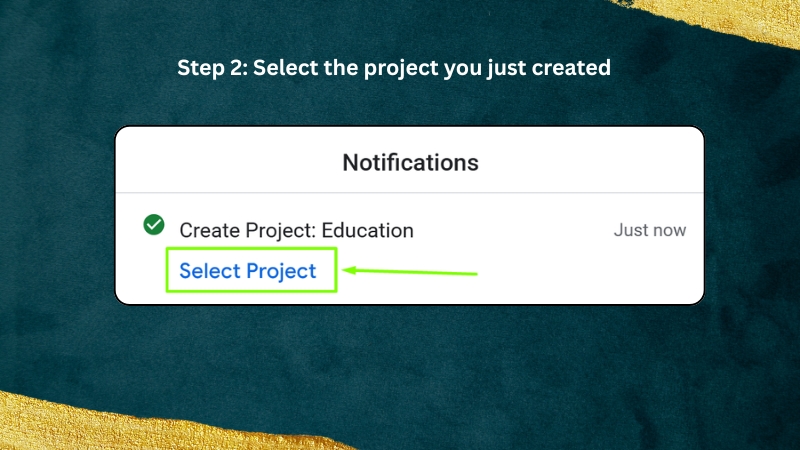
Step 2: Select the project you just created.
You can do this by clicking the notification in the top-right corner. If you missed the notification, just return to the dashboard and select your project from the drop-down menu in the top-left corner. (https://console.cloud.google.com/home/dashboard)
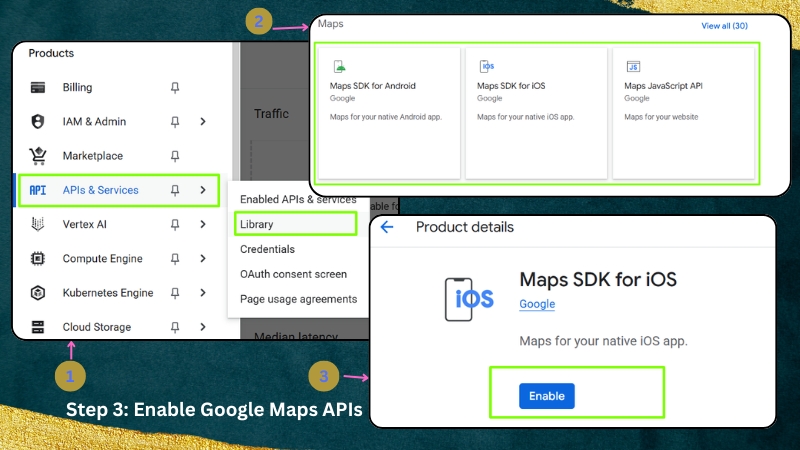
Step 3: Enable Google Maps APIs
Enable the specific APIs you need once your project and billing are set up.
1. Go to the API Library.
2. Search for the APIs you want (e.g., Maps JavaScript API, Places API, Geocoding API).
3. Click on each API and hit Enable.
Step 4: Create Your API Key
Now, it’s time to generate your API key.
1. In the Cloud Console, navigate to APIs & Services > Credentials.
2. Click + Create Credentials > API key.
3. Your API key will be generated and displayed in a pop-up window.
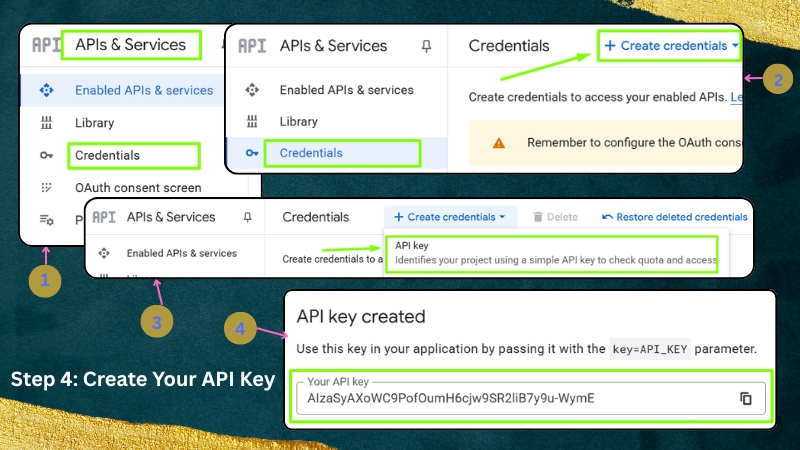
Make sure to copy this key and store it securely. You’ll need it for all API requests.
Step 5: Restrict Your API Key
To protect your API key from misuse, it’s important to restrict it.
Restrict by HTTP referrers (for web apps):
1. Click Edit API key on the Credentials page.
2. Under Application restrictions, select HTTP referrers (websites).
3. Add allowed URLs, e.g., * https://yourdomain.com/*.
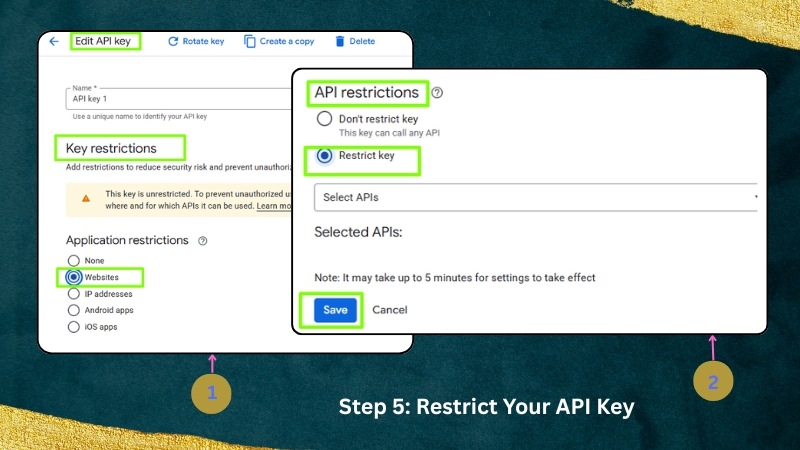
Restrict by API:
1. Scroll down to API restrictions.
2. Select Restrict key.
3. Choose only the APIs you enabled earlier.
Click Save when done.
Step 6: Test Your API Key
To test your API key, you can use a simple HTML file like this:
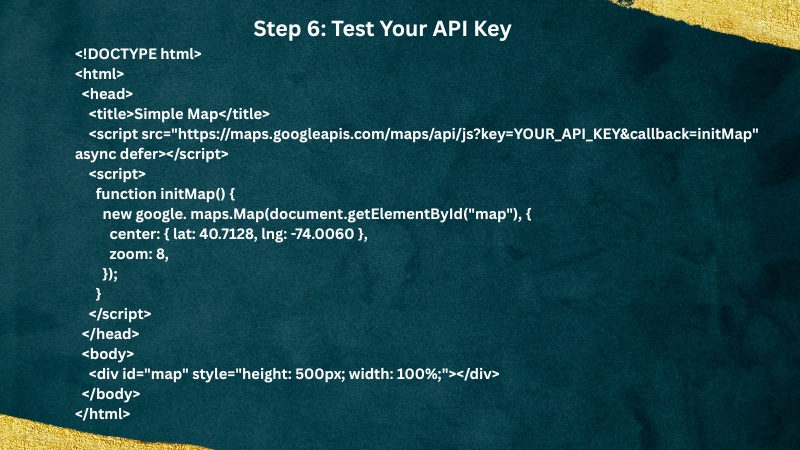
Replace YOUR_API_KEY with your actual key. Open the file in a browser — you should see a map of your City.
Final Tips
1. Monitor Usage: Visit APIs & Services > Dashboard to monitor your API usage.
2. Set Quotas and Alerts: Avoid unexpected costs by setting quotas and usage alerts under IAM & Admin > Quotas.
3. Regenerate Keys if Compromised: If your key is ever leaked, regenerate it immediately from the Credentials page.
Conclusion
Setting up a Google Maps API key might seem intimidating, but by following this guide, you can have your key ready in minutes.
With proper configuration and restrictions, your API key will power rich map-based features safely and effectively.
READY TO GET STARTED?
Join us, 10+ businesses transforming their user experience with ShopyGeo.
Choose Plan- Set up in minutes—no coding required.
- 24/7 support to help you every step of the way.
- Boost accuracy and speed at checkout from day one.